2023年9月17日 星期日

NONS SL42 II + Yashica Lens ML 35mm f2.8 Test Shots 曝光測試

2023.09.09

This time, I tested the shutter of the NONS SL42 II camera using the Yashica Lens ML 35mm f2.8. The lens has a minimum aperture of f16, and if it could reach f22, it would be more suitable for Fujifilm Instax ISO 800 film. The NONS SL42 II is equipped with a 1.8x multiplier lens on top of the Yashica lens, so the film's ISO value will be approximately 800/1.8/1.8=247, close to 250 (based on past experience, I prefer to slightly overexpose Instax film, so I set the light meter to ISO 200). Under sunny conditions, the optimal combination would be f16 and 1/250. Since 1/250 is the maximum shutter speed of the NONS SL42 II, it's challenging to choose a larger aperture like f5.6 or f8 to capture a well-focused subject with a blurred background in bright sunlight.

這次來測試NONS SL42 II相機的快門,使用的鏡頭是Yashica Lens ML 35mm f2.8,最小光圈是f16,如果可達f22將更適合Fujifilm Instax ISO 800的底片。由於NONS SL42 II還會再裝上一個1.8倍鏡,再接上Yashica鏡頭,所以底片的 ISO值將會相當於 800/1.8/1.8=247 接近 250 (依過去使用經驗,我習慣讓Instax底片多曝光一點,所以測光表我設訂成ISO 200)。如過在拍照的Sunny rule下,會是f16和1/250的組合,1/250已經是NONS SL42 II這相機的最高速快門了,所以想要選擇較大光圈如f5.6、f8來拍點主體清楚且背景模糊的相片,在大太陽底下幾乎不可能。

The first set of test shots was taken under a tree shade, creating a somewhat overcast feeling, approximately 3 stops lower than f16, resulting in the combination of f5.6 and 1/250. Under the same EV value, subsequent photos were taken with the combinations of f8 and 1/125, f11 and 1/60, and f16 and 1/30, respectively. Upon closer inspection, except for the fourth photo, the central area of the other photos shows slight overexposure, suggesting that the shutter speed scaling in the center might be slower. The fourth photo itself is clearly underexposed, and my guess is that the lens might have over-closed at f16, requiring a compensation of 0.5-1 stop.

第一組測試點是在樹蔭下,大概是陰天的感覺,比f16低3級,也就是f5.6與1/250的組合,再相同EV值下依序拍得f8與1/125、f11與1/60、f16與1/30組合的相片。仔細看除了第4張相片,其他相片的中央,都有些許過度曝光,推測這快門的縮放在中央的速度可能較慢。而第4張相片本身也很明顯曝光不足,我的推測是鏡頭在f16光圈可能縮過頭了,可能要補償0.5-1級才行。

First Set - No ND4 Neutral Density Filter 
第一組 無ND4減光鏡

#1. f5.6 1/250

#2. f8 1/125

#3. f11 1/60

#4. f16 1/30


The second set of test shots captured the exterior of a building with reflective beige tiles. The metering result should have been adjusted by an additional 1 stop of exposure, but I overlooked this while focusing on the installation of the ND4 neutral density filter. The light meter's ISO value needed to be adjusted to 50 when using the ND4 filter. It can be observed that, under slight underexposure conditions, only the central point (windows) of the fifth photo shows a slight white overexposure. Similarly, the eighth photo with f16 shows underexposure.

第二組測試點拍攝的建築物外觀是會「反光」的土黃色磁磚,測光的結果應該要再加1級曝光,但拍攝當下我忽略了,只專注於鏡頭加裝ND4減光濾鏡後須將測光表的ISO值調整為50。可以觀察到,再曝光較為不足的情況下,只有第5張相片的中心點(窗戶處)有些許泛白的過曝。同樣的第8張f16曝光不足。

Second Set - No ND4 Neutral Density Filter
第二組 無ND4減光鏡

#5. f5.6 1/250

#6. f8 1/125

#7. f11 1/60

#8. f16 1/30


The third set of test shots was taken under a tree shade, capturing backlit leaves. Due to a large area of overexposed sky in the frame, the overexposure in the central area of the photo becomes apparent, especially when the overexposed sky area is larger (as seen in the tenth photo), resulting in overexposure above the tree shade.

第三組測試點是在樹蔭下拍攝背光的樹葉,由於畫面中有較大面積的過度曝光天空,相片中央的過度曝光區域變得很明顯,當過度曝光天空面積更大時(如第10張相片),樹蔭上方也出現過度曝光的現象。

Third Set - No ND4 Neutral Density Filter
第三組 無ND4減光鏡

#9. f5.6 1/60

#10. f8 1/30


Based on the above tests, it is speculated that when there is a large area of overexposure in the photo, it leads to overexposure in the central area and even other sections of the image. This issue persists even at slow shutter speeds of 1/30 and 1/60.

經過以上測試,推測當相片畫面中有較大面積的過度曝光區域時,就會造成畫面中心,甚至其他區塊的過曝,即使是在慢速快門1/30、1/60下仍是無法避免。

2023年9月9日 星期六

Cemented Faces Repaired, Carl Zeiss Mirotar 8/500 T* 鏡片膠合異常

2023/9

Over the past few years, I have often purchased second-hand lenses from Yahoo Auctions Japan. The main reasons are the wide selection and reasonable prices (the depreciation of the Japanese yen is also a factor). Of course, there have been quite a few cases of stumbling upon lemons. Minor issues like loose parts leading to the aperture not opening or small patches of spiderweb-like mold are still relatively easy to deal with.

This time, I hit a major snag. The purchase price of this lens was about sixty percent of the market price, and as soon as I received it, I was startled by the droplet-shaped reflections on the reflective mirror elements. It didn't look like mold, and I suspected it might be due to the silver coating on the reflective mirror cracking. It seemed unlikely to be salvageable, but I decided to give it a shot and consulted a professional technician.

I made an appointment with the technician, and upon inspection, he determined that the poor adhesion between lens elements was causing the issue. There are two lens surfaces on this lens that need to be bonded with special glue. The previous repair technician probably didn't bond them properly, causing air bubbles in the adhesive, resulting in marks resembling water droplets.

這幾年常常從日本Yahoo拍賣購買二手鏡頭,主要是選擇多,價格合理(日幣貶值也是因素之一),當然踩到地雷的案例也不少,小問題像是零件鬆脫導致光圈無法開啟、小範圍蜘蛛網狀霉絲都還容易處理。

這次算是採到大地雷,這顆鏡頭的購入價約是市價的六成,拿到手後第一時間就被反射鏡組上反射的水滴狀影像嚇到,看起來不像霉絲,自己判定可能是反光鏡的鏡面塗銀層龜裂,很可能沒救了,不過還是死馬當活馬醫吧,找專業的師傅看看吧。

跟師傅約了時間,師傅看了一下就判定這是鏡組間黏合不佳,這鏡頭有兩處鏡片接觸面須用專用膠黏合,前一位修鏡師傅應該沒黏好了,導致黏膠間產生氣泡,形成類似水滴狀的痕跡。


Water droplets in Front View
鏡頭正面水滴狀脫膠


Water droplets in Rear View
鏡頭背面水滴狀脫膠


The technician explained that if it were old factory lenses, heating the lens group after applying adhesive could separate them. If it was a more recent adhesive, such as UV glue, it would require soaking in a solvent solution to separate them. Two weeks later, the technician returned the lens to me, now clean and pristine, explaining that the lens group was separated after soaking in the solvent and then re-bonded after cleaning.


修鏡師傅表示如果是舊的原廠鏡片黏合膠應該加熱後鏡組就可分離,如果是必較近期的黏合可能是用UV膠,需要泡溶劑藥水才可分離。兩週後,師傅交還給我乾淨漂亮的鏡頭,並說明是泡溶劑後分離鏡組,清潔後再重新黏合。


The lens after repair
經修復後的鏡頭


Carl Zeiss Mirotar 8/500 T*
Cemented Face 膠合面示意圖


2023年1月1日 星期日

NONS SL42 II + Carl Zeiss Planar 50mm f1.4 @ NTU 台灣大學

2022.11.3

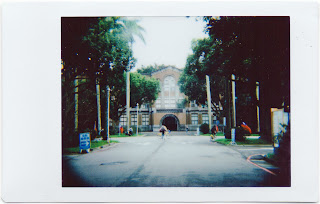
Went for a stroll at National Taiwan University and tested the NONS SL42 II + Carl Zeiss Planar 50mm f1.4 combo. Noticed significant vignetting at the image periphery, similar to what I observed in the previous test with the Carl Zeiss Distagon 35mm f1.4. I speculate that this vignetting is caused by the 1.8X (NFE) lens attachment on the NONS SL42 II (the diameter of the 50mm f1.4 rear lens element is larger than that of the 1.8X lens). Based on my experience, using the Asahi Optical SMC Pentax 35mm f3.5 minimizes vignetting because the diameter of the rear lens element in the 35mm f3.5 is smaller than that of the 1.8X lens.

台灣大學散步,順便進行 NONS SL42 II + Carl Zeiss Planar 50mm f1.4 測試,成像週邊有很明顯的暗角,這跟之前測試過的 Carl Zeiss Distagon 35mm f1.4 差不多。我研判這暗角應該是 NONS SL42 II上裝的1.8X (NFE)鏡造成的 (50mm f1.4後鏡組鏡片的直徑>1.8X鏡的直徑),依使用經驗,如果是使用 Asahi Optical SMC Pentax 35mm f3.5 則暗角不明顯,(35mm f3.5後鏡組鏡片的直徑<1.8X鏡的直徑)。

Furthermore, this camera features a leaf (circular) shutter, but due to its slower opening and closing speed, photos taken at shutter speeds of 1/125-1/250 seconds show overexposure by 0.5-1 stop at the center. To avoid this phenomenon, it is recommended to primarily use shutter speeds below 1/60 second (if necessary, ND filters can be used, as the ISO 800 of Instax film is highly sensitive in daylight).

另外,這個相機採用的是葉片(圓形)快門,但是因為快門開闔的速度還不夠快,導致在1/125-1/250秒快門時所拍攝的相片其中心點的曝光會多0.5-1格,為避免這個現象破壞作品,建議以使用1/60秒以下快門為主 (必要時可搭配ND濾鏡使用,因為ISO800的Instax 拍立得相紙,在白天是外的感光度實在太高了)。


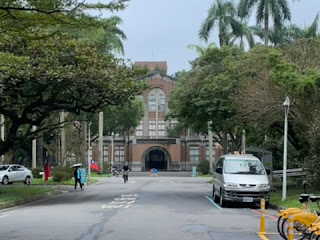
The light sensitivity and latitude of Instax Mini film are significantly lower compared to the iPhone camera. In the comparison, the shadows in the Instax photo are almost entirely black, and the lightly blue sky is overexposed, resulting in a whiteout. Instax film is truly only suitable for shooting subjects with relatively even lighting.

Instax mini 拍立得相紙的感光寬容度和 iPhone 手機的相機比起來,真的差很多,可以看到前者的樹蔭近乎全黑,且淡淡藍天已經過度曝光泛白,Instax 拍立得相紙真得只適合用來拍光源較為平均的主題?


Lastly, here is a photo taken with the test combo NONS SL42 II + NFE + Carl Zeiss Planar 50mm f1.4.

最後,來一張本次的測試組合 NONS SL42 II + NFE + Carl Zeiss Planar 50mm f1.4。


NONS SL42 Introduction 相機介紹
https://nonscamera.com/zh-tw/products/nons-sl42-black

Passive EF mount (no electronic signal output, cannot autofocus or control aperture electronically)
Shutter speeds (10 steps): 1/250, 1/125, 1/60, 1/30, 1/15, 1/8, 1/4, 1/2, 1 second, and B shutter
Recommended aperture based on current shutter speed, displaying F-values
B shutter timer can go up to 999 seconds
Film counter, battery status display
Standard hot shoe, syncs with shutter at 1/250
Power: 3200mAh built-in lithium battery, Charging: DC 5V, 1A
Film: Fujifilm Instax Mini
Film size: 54 x 86 mm (width x height)
Image size: 46 x 62 mm (width x height)
Dimensions: 158 x 65 x 116 mm (length x width x height)
Weight: 510 g

被動EF卡口 (無電控信號輸出,無法自動對焦或者電控光圈)
快門速度 (10 檔): 1/250, 1/125, 1/60, 1/30, 1/15, 1/8, 1/4, 1/2, 1 秒 和 B快門
基於當前快門速度推薦光圈,顯示 F數值
B快門計時器最高可以到999秒
菲林計數,電池狀態顯示
標準熱靴,快門同步到 1/250
供電: 3200mAh 內置鋰電, 充電: DC 5V, 1A
菲林: Fujifilm Instax mini
菲林尺寸: 54 x 86 mm (寬 x 高)
圖像尺寸: 46 x 62 mm (寬 x 高)
外形尺寸: 158 x 65 x 116 mm (長 x 寬 x 高)
重量: 510 g